2017-11-19 | UNLOCK

TODOS案例(二)

TODOS案例(二)

界面样式设计

上一期我们简单对页面元素进行了添加,本篇将对界面样式进行设置和布局。
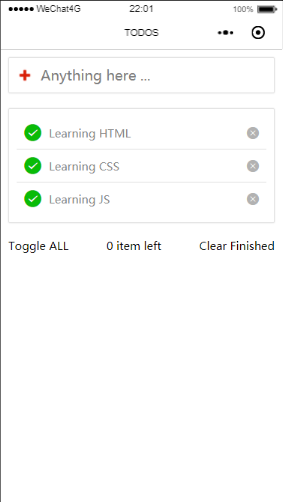
最终呈现的效果如下图

先对input框进行调节,给input框一个边框以及颜色,内外边距统一为20rpx,边框圆角统一为5rpx,盒子阴影设置为5rpx模糊程度。

考虑到内部图片和输入框的横向排列,我们采用flex布局方式,给.search的display设为flex,为了使内部组件在水平线上对齐,设置align-item为center

代码如下

1
2
3
4
5
6
7
8
9
.search {
border: 1rpx solid #e0e0e0;
margin: 20rpx;
padding: 20rpx;
border-radius: 5rpx;
box-shadow: 0 0 5rpx #e0e0e0;
display: flex;
align-items: center;
}

再设置添加图片大小以及设置和右侧文本框的距离:

1
2
3
4
5
.search image {
width: 45rpx;
height: 45rpx;
margin-right: 20rpx;
}

这样input部分调整完成!!

下面开始调整中部的样式,我们同样给边框设置相同样式!

1
2
3
4
5
6
7
.todos {
border: 1rpx solid #e0e0e0;
margin: 20rpx;
padding: 20rpx;
border-radius: 5rpx;
box-shadow: 0 0 5rpx #e0e0e0;
}

在对内部item组件进行调整,并且同样采取flex布局,两端的icon我们在属性里设置为30大小,中间文本框采用flex自动撑开

1
2
3
4
5
6
7
8
9
10
11
12
.todos .item {
padding: 20rpx;
border-bottom: 1rpx solid #e0e0e0;
display: flex;
align-items: center;
}
.todos .item text {
flex:1;
font-size: 30rpx;
color: #888;
margin-left: 20rpx;
}

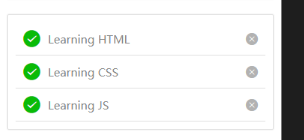
为了样式美观,我们将最后一个item的下边框去除

1
2
3
.todos .item:last-child {
border-bottom: 0;
}

最后设置底部部分,简单采用flex布局,并使布局方式justify-content设置为space-between

至此样式布局完成!!!

下篇将介绍如何抽象数据模型。

评论加载中